Residential Construction Cost Is Soaring by Josh Brincko

Here’s a line graph that compares various types of construction and the rising cost over the years. Residential construction costs have risen the most and have continued to rise. It wasn’t long ago when a home could be built for $150 per sq ft, but now the average in my market is closer to $400 per sq ft. Even the purchase of an old home (in Seattle) proportions out to around $400 per sq ft or more, so it’s also expensive to move. Just last year, an 8’ long 2x4 was about $2. Now it’s over $8! We have all felt this growing trend in the construction industry, and I am always looking for cost saving, smart design strategies, to make remodels and new construction projects affordable for my clients. The graphs below from respected analyst, https://edzarenski.com/, depict the growing trend (and cost) associated with the residential construction industry which has been growing as more people are spending more time living (and working) at home during the pandemic.

***amended for 2023 figures, most builders of full home projects tend to charge around $400 per square foot for entry level construction quality and $600 and up for high end quality. Smaller projects tend to have less economy of scale and can cost more.***

construction cost 2020 residential 1.jpg
construction cost 2020 residential 2.jpg
construction cost 2020 1.jpg


If you’d like to learn more about our design process, visit www.josharch.com/process, and if you’d like to get us started on your project with a feasibility report, please visit www.josharch.com/help

Tuxedo T-shirt by S. Joshua Brincko

This is a tuxedo. It has depth, contrast, and shadow lines from the different materials. Good buildings have depth and contrast from different materials.

This is a tuxedo. It has depth, contrast, and shadow lines from the different materials. Good buildings have depth and contrast from different materials.

This is a tuxedo T-shirt. It is not a tuxedo. The two-dimensional prints are not real. Bad buildings do this when different materials are “co-planar.”

This is a tuxedo T-shirt. It is not a tuxedo. The two-dimensional prints are not real. Bad buildings do this when different materials are “co-planar.” Tuxedo T-shirts are funny. Do you want your building to be funny?

Josh refers to the “tuxedo T-shirt” quite often when explaining the rationale behind a design solution. What does he really mean by this? Think about what a tuxedo actually is? A tuxedo is a collection of a few, distinct, three-dimensional elements that contrast one another. Specifically, there is a bowtie made of one material, a shirt of another, and a jacket of another. Each of these three-dimensional items have their own contrasting shape and associated material. The contrast between them creates depth and interest. Each item also has its own function. The function of each item relates to the decision of which fabric is most appropriate for each piece. The shirt is a thinner fabric while the coat is a thicker one. The bowtie is commonly done with an entirely different, contrasting fabric (of color/texture) due to more its ornamental nature.

With a tuxedo T-shirt, all of those different elements are silk screened onto a single piece of fabric to look as closely as possible to a real tuxedo. Although there’s something fun about a tuxedo T-shirt, anyone would agree that a regular tuxedo is far more interesting than a tuxedo T-shirt. This is because of the depth and individuality of each of the different pieces on a real tuxedo. A tuxedo T-shirt has no depth. It is a two-dimensional manifestation of a 3-D object. It is an imposter. It is dishonest. It is a con. It is what is wrong with design.

The tuxedo T-shirt is what happens when materials for a façade of a building are arbitrarily selected without regard to the three-dimensional feature they cover. You wouldn’t expect to see a coat from a tuxedo with one material on the front and a separate contrasting material on the back. It wouldn’t make sense. The coat is one distinct object with one distinct and consistent material. Similarly, if you turn an apple around, you would not expect to see an orange. The materiality of an apple is distinct to the properties of an apple. As you might expect, the stem of an apple is a different material than the skin of an apple. This is because the three-dimensional object, known as the stem, performs a different function than the peel. They contrast each other visually, and they perform a different function. The change in material and shape makes sense.

Buildings use the same philosophy. One part of a building performs a specific function, so that part has a distinct material from other parts that perform different functions. It would not make sense for the corner of a building to have one material on one side but magically change to a different material on another side for no reason. Or even worse, you would not expect a simple flat façade to arbitrarily change to another separate material without any change in the depth between those two materials.

Appropriately selecting materials for the objects we design is part of what we do, and it is also one of our core values. To do our jobs appropriately, we must select materials for the objects (or parts of the building) we design, and it is also one of our required virtues to do this properly, in an obvious manner, and creatively. In order to do our jobs well, we commit to following our core values to guarantee success. We hope you will appreciate our adherence to our standards that we have set for ourselves, and we welcome the opportunity to explain them to you in further detail.

The images below depict examples of tuxedo T-shirts (flat facades) and also examples of more thoughtful facades (with depth) where the materials relate to their purpose and function. You will notice there is no apparent reason whatsoever for the facades on the tuxedo T-shirts to have different materials - they are just “lipstick on a pig” or a decorated shed (the concept coined by famous architects Robert Venturi and Denise Scott Brown which means to cover a utilitarian building with decoration to give it more interest than it really has).

If you’d like to learn more about our design process, visit www.josharch.com/process, and if you’d like to get us started on your project with a feasibility report, please visit www.josharch.com/help

A terrible flat facade with no reason for changing siding

A terrible flat facade with no reason for changing siding

There is no reason to change materials near the roof and no reason for the fake thing that sort of looks like a truss at the top

There is no reason to change materials near the roof and no reason for the fake thing that sort of looks like a truss at the top

The bumpout changes material and color. That makes sense. Nicely done by Stuart Silk Architects.

The bumpout changes material and color. That makes sense. Nicely done by Stuart Silk Architects.

The stone at the entry is set forward and contrasts the siding behind that is setback. The roof plane does its own thing. They all have a different purpose, with different material, with different depth.

The stone at the entry is set forward and contrasts the siding behind that is setback. The roof plane does its own thing. They all have a different purpose, with different material, with different depth.

The dark metal bumpout contrasts the light wood wall with a change in height, width, and depth.

The dark metal bumpout contrasts the light wood wall with a change in height, width, and depth.

The dark metal trim contrasts the soft warm wood siding

The dark metal trim contrasts the soft warm wood siding

The solid dark upper level contrasts the open glassy lower level. The concrete wall plane recesses back to create more contrast. The concrete wall plane has no other material on it. Although you cannot see the back of the concrete, you know it is co…

The solid dark upper level contrasts the open glassy lower level. The concrete wall plane recesses back to create more contrast. The concrete wall plane has no other material on it. Although you cannot see the back of the concrete, you know it is concrete. Although you cannot see around the corner of the upper floor, you KNOW it has the same dark siding. The same dark siding runs below, and conceptually, it would also continue on the roof (the same way the skin of an orange covers the entirety of the fruit without an arbitrary change in material.

The Cost of Design by S. Joshua Brincko

dollar design.jpg

What does an architect charge to design stuff? The short answer is: for a typical house project, most architects charge a design fee above $20,000, and over $100,000 is also not uncommon for a decent sized project. The fee is usually billed by the hour, and it is proportional to the size and complexity of the project. According to the American Institute of Architects, design fees for remodels are generally around 15% of whatever the construction cost ends up being and around 10% of the construction cost for designing projects from the ground up (new construction). For the thousands of hours a team of architects puts into designing a building, this 10% fee is not much higher than the 6% fee real estate agents will get when they sell the building. (Do the real estate agents collectively work thousands of hours for that fee?)

This may seem like a lot of dough for someone to draw some pictures of a building, so let’s discuss what clients get for this investment (and what the architect earns) since the architect does so much more than just the drawings:

  1. The drawings. These are the most tangible deliverable. They show the building department the info needed to get a permit, and they explain to builders how to build the building. You may think, “I took a CAD class in high school, so I can draw up some plans.” It’s not so much about knowing how to draw. It’s more about knowing WHAT to draw (which brings us to the next topic - and why the drawings are less valuable than the mere access to the architect to get you through the whole design and construction process).

  2. Experience. The drawings communicate a ton of contractual information that takes a lifetime of focused learning to successfully convey to building departments, engineers, builders, material suppliers, and clients. Architects figure out the best way a building can satisfy their clients’ needs, and they also have figured out how to most appropriately get the building built, so it will be in line with the clients’ expectations, budget, schedule, building codes, zoning codes, builders’ capabilities, material limitations, and so many more factors. All of these factors are distilled into technical drawings and documents to communicate the requirements to the appropriate parties. Much of the benefit of “experience” is not through drawings, but rather through verbal communications and visual inspections with the architect where quick, focused feedback saves thousands on the cost of construction as builders run into issues. This leads to the next benefit…

  3. Time. With any project, there are many critical moments before and during construction when your architect MUST be available. There are deadlines with building departments, builders needing a clarification on a construction technique NOW, a client having a freak-out meltdown over a builder’s bid, an inspector “requiring” something (expensive) that’s not actually required, or a moment when a client has a sleepless night over the biggest investment of their life (their new building), and they just need the leader of the whole process to help them make a crucial decision. I have had countless times where I have had to leave a soccer game, work all night/weekend, cancel fun plans, miss other obligations, and even lose out on time with my family because my clients’ projects require something that cannot wait. I think of it as “renting my brain.” Architects are also available when clients don’t need them. Sometimes the timing doesn’t work out as we are waiting for an approval from a building department or an engineer to finish their work, and architects must still be available and keep their business running with the lights on ready to go when there is crucial work to be done much like the surgeon is waiting in the ER just in case help is needed.

  4. Creativity. People may know when they like or dislike something they see, but usually they do not know WHY. Your architect does. Your architect knows what you want even when you don’t (and even when you think you do know what you want but actually don’t - your architect can see into your soul). It is sort of like those frustrating times as a teenager when you were about to do something dangerous, your parents told you not to, but you did it anyway and got hurt. They knew what would happen before it happened much like a good architect has good insight on your project. When a client starts talking about what they want to do, an architect already knows what they will say next, what parts of that request won’t actually come to fruition, and how to guide you toward the solution that you are really trying to describe. Your architect gives you options that you would have never imagined on your own. Your architect shows you why the best solution is the best - even if it’s something you initially wouldn’t consider. Your architect wants you to be inspired by the space that you will build. The creativity doesn’t stop with the design of the building though. The creativity carries through in less obvious ways like: thinking of ways to get permits for things the building department says “can’t be done,” or thinking of ways to convince a builder to build something in an innovative way that will save you money, or helping you figure out the best real estate value for different ways you could build your project, or even finding cost saving methodologies on how you could sequence your project. Your architect is there for you to find solutions to all sorts of problems.

  5. Assurance. When you hire an architect, you are getting the assurance that your building will perform appropriately. It won’t leak. It will meet your needs. It will be comfortable. It will be safe. As long as the architect is retained through the whole project and during construction, your building will perform very well. If you only commission the architect to do part of the job, it’s like making the beginning part of a sandwich: just the bread - it won’t be very good. The architect needs to do the whole process for it to really work.

  6. Coordination. Your architect will coordinate all the different people that make your building become a reality. Architects understand all the technical information from builders, product suppliers, building departments, and engineers, and they combine all of that information into a cohesive set of documents that your project team needs to build the project. The architect coordinates the work of surveyors, structural engineers, mechanical engineers, electrical engineers, plumbing engineers, geotechnical engineers, civil engineers, builders, building departments, inspectors, arborists, ecologists, biologists, landscape architects, lighting designers, smart home technology providers, real estate agents, archaeologists, historians, neighborhood groups, and/or many different material suppliers.

  7. Concierge. In addition to coordinating all the parties above, the architect is your concierge throughout the process. If a time-sensitive document needs taken from the building department, to a notary, and to the county recorder office before they close for flag day or whatever other holiday governments take, your architect does that. If you need to see samples of different tiles, your architect arranges that and brings them to you for approval. If you want to see what different stains on different woods look like, your architect makes that happen. If you have a disagreement over your builder’s bill, your architect has the technical expertise to mediate that. If you want to see an example of a certain type of product that was installed in a different building before you decide to buy it, your architect sets up an appointment to visit someone else’s home or business to see it. Your architect is there to get you through the entire process and to make it as easy as possible. Things that may seem difficult for you are easy, everyday tasks for your architect.

So with all the service an architect dedicates to a project, what does the architect do with their design fee? It is common for 1/3 of it to be paid to the staff member that did the task, and 2/3 of it goes toward overhead expenses of operating the firm. Any leftover from overhead is profit for the firm. If your architect charges $150/hr, it is likely that the architect does billable work about half the time (at most). In a typical 2080 hour work year, that’s about 1000 billable hours in a year or often much less. Of that $150,000 billed, that would be $50,000 for the architect’s salary and $100,000 for the overhead for things like professional liability insurance, general liability insurance, computers with VERY expensive software, rent, and an operation budget (to name a few). When the office is slow, when we mess up a tile order, or when a client doesn’t pay a bill on time, there better be something leftover in that overhead expense to keep the firm running. Does that sound lucrative? Do you want to be an architect? We do it because it is rewarding work (not necessarily in the financial sense).


Here are some additional resources that substantiate the figures above:

State of Washington Guide

Washington Post

Architectural Fees Website

Royal Architectural Institute of Canada (Published by American Institute of Architects - see page 11 TIER 7, and page 30 which defines custom residential as being in the most complex tier.)

Curbed.com  

Home Advisor (scroll down to "How Much Do Architects Charge as a Percentage of a Project?")


If you’d like to learn more about our design process, visit www.josharch.com/process, and if you’d like to get us started on your project with a feasibility report, please visit www.josharch.com/help

The Architects Band by S. Joshua Brincko

There’s a dude named Josh in a heavy death metal band called The Architects that looks something like me. No, it’s not me. Yea, he’s an “architect,” also named Josh, the same age, physique, hair, and very handsome, successful, and talented, but no, it’s not me. Ok, yes, it actually is me. Most of you didn’t know I was in a death metal band. Just kidding. It’s really not me. Or is it? Google “josh architect” and decide for yourself.

Either way, if you’d like to learn more about our design process, visit www.josharch.com/process, and if you’d like to get us started on your project with a feasibility report, please visit www.josharch.com/help

public.jpeg
public.jpeg
public.jpeg

That’s all folks.

If you’d like to learn more about our design process, visit www.josharch.com/process, and if you’d like to get us started on your project with a feasibility report, please visit www.josharch.com/help

Occupancy (don’t read…too boring) by S. Joshua Brincko

This is the most boring post I have ever written, but if I asked you to read it, please do. Thank you:)

As an architect, above all else, I need to do the right thing when it comes to designing buildings to ensure they perform well and are safe. The buildings architects design have a huge effect on how people live, work, and experience the world around them.

The building code is really a collection of different ambiguous books that govern the design and construction of fire safety systems, electrical, plumbing, structure, mechanical, energy conservation, and more.

If you read the codes, you will rarely find any language that exactly pertains to your situation, so the architect must propose a plan that the building department must review. The interpretation of the building department and architect do not always align. An architect could read a code and interpret it in the complete opposite way of the building department. This is partially because the building department takes a conservative approach to make things as safe as possible. This is easy for the building department since they don’t have to pay for safety features like fire sprinklers, fire-rated walls, fire detection systems, multiple exit routes, backup power supplies for exit lighting, etc. These are all expenses that most building owners do not want to incur. Sure, building owners and architects both want their buildings to be safe, but there is a certain level of common sense that should be applied.

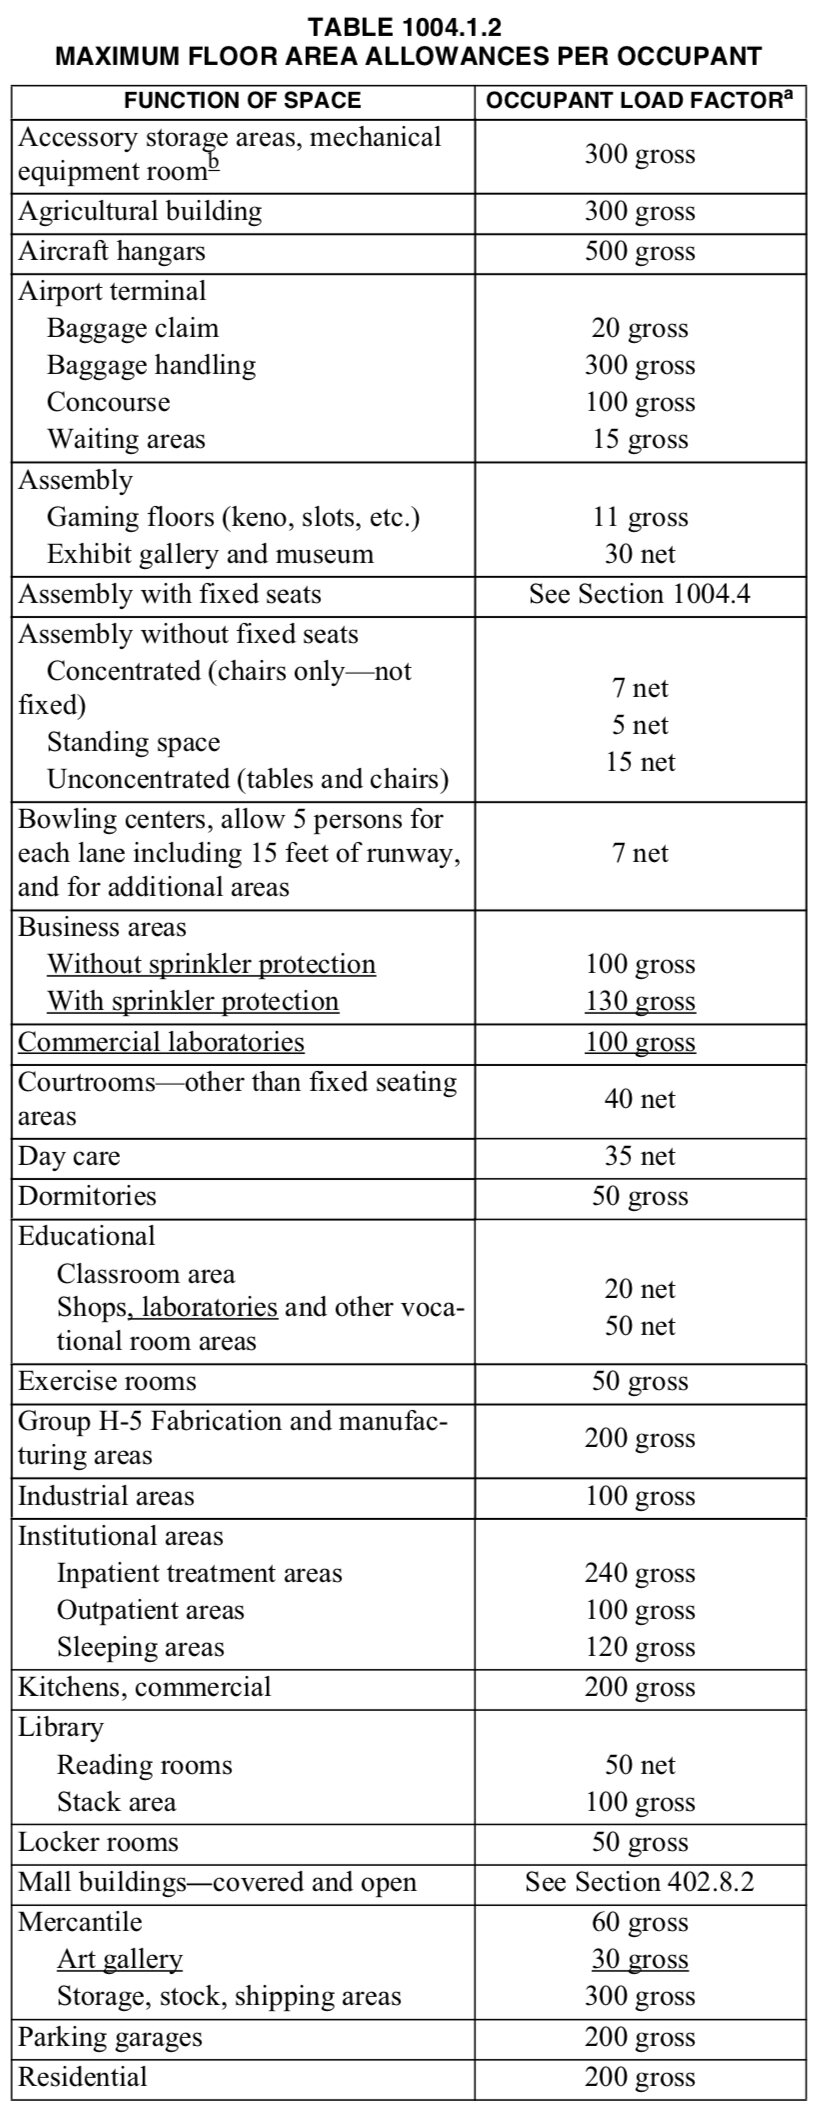
An architect is very good at recommending, interpreting, and negotiating the way codes get implemented. One major code issue stems from the number of people, known as occupants, that are allowed in a space or an entire building. Codes vary from place to place depending on many circumstances, but generally speaking, an office space may allocate 1 occupant per 100sf, but a waiting area may allocate 1 occupant per 5sf. Therefore the waiting area can fit a lot more people than an office, but this is not necessarily a good thing. If a 100sf waiting area fits 20 people (100/5=20), and a 100sf office fits 1 person (100/100=1), the total number of occupants allowed is already up to 21. Once you add up the occupants allowed in other rooms, the number gets even higher. In many cases, if the occupant load (number of people) exceeds 49, then you may need to add another exit door or potentially fire sprinklers depending on a few factors. That may not be possible financially or technically from a space layout point of view. Not only does the number of occupants affect the number of exits and sprinklers, but it also dictates the number of toilets, sinks, drinking fountains, parking spaces, hallway widths, and many other factors. In light of this, there is incentive to keep the occupant total lower. This results in strategically designating spaces, so the math for occupant load works in the client’s favor. By calling a space the wrong thing, it could trigger some very expensive construction requirements that could become project stoppers.

As an architect, I can be a very helpful guide to ensure you get a safe, functional building within reasonable limits.

If you’d like to learn more about our design process, visit www.josharch.com/process, and if you’d like to get us started on your project with a feasibility report, please visit www.josharch.com/help

IMG_1799.jpeg

How to Build Stairs by S. Joshua Brincko

Stairs can be a great, sculptural focal point for a home, deck, or business, and they certainly provide a useful function too: to get you up and down safely. Stairs are complicated. They are tricky to design, tough to build, and there’s a whole myriad of codes that must be complied with. As an experienced architect and craftsman, I have learned a few tricks over the years for building stairs. There’s some seasoned veterans out there that can do it well too, but I have created some unique tricks that have helped many builders.

On most projects, I’ll get a call from the builder about how to frame the stair. As an architect, framing is not in my purview, but I get it… being out there on a hot, cold, windy, or rainy jobsite perched high up on a ladder is not the best place to figure out how to fit one of the trickiest things you can build into a project. With a couple measurements, I can usually help the builder figure this out rather quickly. All I really need is the exact change in vertical height from one floor to the other and the exact horizontal length from one landing to the next. Depending on the design, there’s a few other bits of info I may need, but I can advise on those when applicable.

Once I have those critical measurements, I can draw the stair stringer (or stair carriage) in autocad. This enables me to create an exact diagram of all the parts and pieces needed for a stair. After I’ve drawn it, I can send the builder all the measurements needed to confirm it works. I can also send full sized printed templates to the job site, so builders can simply “trace” them with a saw. This takes all the guesswork out of it. In some applications, I could even cut the stair stringer on a CNC milling machine to send the finished product to the job site ready to install. Imagine the entire day you spend planning and measuring (and re-measuring) for a stair being unnecessary because a perfectly cut stringer magically shows up on the job site for you.

Feel free to reach out if you need help with a stair you are planning. This will save you time and money.

Also for reference, there’s a lot of codes that relate to stairs, and some of the more common ones for residential applications are (check your codes in your area to verify and consult with a professional to confirm):

  • treads must be a minimum of 10”

  • risers have a maximum of 7.75”

  • treads must be a minimum of 36” wide

  • handrails may project up to 4.5” over the treads on each side

  • handrails must be 34”-38” high

  • guardrails must be 36” high with a maximum spacing of 4” (6” ok at the triangular area of tread/riser) and must withstand 200 pounds of force in all directions

  • landings must be the same width as the stair and at least 36” long

  • there are also additional codes to comply with

Hand Drawing is Still a Thing! by Josh Brincko

190928_Trace_Top10_07_JoshBrincko

Architects draw most things on a computer with AutoCAD. It makes sense for most stages of the process. I have discovered a hack for designing and drawing construction details though. Construction details are “zoomed-in” drawings that focus on the connection between different materials. They help to communicate to the builder the real goal with how things get put together. These are typically drafted in black and white in AutoCAD, but we have found that they are tough to understand, time consuming, and builders rarely actually reference them in a set of plans.

With the use of my iPad and it’s Apple Pencil, I have discovered a magical app (by recommendation of Andres Villaveces at Metrica) that allows me to draw “by hand” but still digitally. The Apple Pencil actually feels and operates like a real pencil, but it works even better… and you can undo mistakes, you don’t get lead all over your arm/shirt, and I can draw while sitting on the couch or virtually anywhere (a drafting table is no longer needed).

Builders love the drawings because they actually understand them, and it saves me (and my clients) time in drawing them. The app I use, called Morpholio Trace, actually featured my work in its recent top 10 list: https://medium.com/@morpholio/top-10-trace-sketches-of-the-month-290fb2c8e1b3. It has been such a great technological advancement in my industry that has increased my productivity. I can also use it to review my coworker’s drawings for quality control. The days of printing, redlining, scanning, and emailing are over for the simple task of checking drawings. I can now just “redline” (review) progress work directly from my ipad and easily email it.

If you’d like to learn more about our design process, visit www.josharch.com/process, and if you’d like to get us started on your project with a feasibility report, please visit www.josharch.com/help

Radiant Floor Heating by S. Joshua Brincko

Radiant floor heating…It’s awesome! Does it make sense in your situation?

In the USA, the most common type of heating is a furnace, called “forced air,” that blows air around your house in metal duct work. When the house gets cold, the furnace kicks on, and you feel warm air blowing out of the vents. Then the air in the room cools down again, and the process continues. This is a sort of instant gratification. It is very American, actually.

Let me illustrate this with an analogy. Your body is 98.6 degrees, right? When you exhale, your breath is about 98 degrees or something less. If our hands are cold, we can blow air out of our mouth to warm up our hands. Do your hands stay warm after one breath of air, or do you need to keep blowing air? Imagine trying to warm up a cup of coffee with your breath. It could probably be done, but it would take a constant flow of heat from your breath to accomplish this. You will probably pass out before the coffee heats up. THE SAME THING HAPPENS WITH A FURNACE. When hot air blows out of your vents, it warms up the air, but it does not warm up the floors, the walls, the tables, the chairs, and all the other solid items in your house. Do you remember learning about conduction in science class? More heat can be stored in a solid or liquid than a gas. Air is a gas, and furnaces try to heat you (a solid) and your house (a solid) by storing heat in air that blows on you. It does not have a lasting effect, and therefor it is not efficient. (It also blows a lot of dust, mites, and other allergens around that are not good for your respiratory health).

Radiant heating works by transferring the heat from a liquid to solids. In other words, water in pipes is heated up, and those water pipes touch your floors and transfer the heat to your floors. The heat in your solid floors conducts to the other solid items in your home, and the heat is more efficiently stored. It also feels more cozy because it is a long-lasting, continuous heat that warms you to the core instead of just blowing air over your skin.

Staple-up in-floor heating pipes with metal fins to disperse heat

Staple-up in-floor heating pipes with metal fins to disperse heat

Notice all the STUFF in the ceiling of an existing home. This must all be removed and replaced before installing in-floor radiant heating pipes.

Notice all the STUFF in the ceiling of an existing home. This must all be removed and replaced before installing in-floor radiant heating pipes.

So how do you get radiant floors in your home? Water pipes (usually plastic called PEX) need to be attached to your floors. This is easiest to do when your house is under construction. If you are pouring concrete floors, the PEX is laid our before the concrete is poured, and they get permanently cast into the concrete. If your floors are framed with wood, the PEX is usually stapled up to the underside of the floors. This is pretty easy to do in new construction since there’s not too much stuff in the way (like lights, wires, insulation, and plumbing). In a remodeling situation, it is a bit more challenging since you first need to remove the ceiling and everything inside of it before you can staple up the PEX. You even need to grind away any nails or staples that may be poking through the floor, so they don’t accidentally puncture the PEX water pipes. This demolition work can get very expensive (likely more costly than the price of the radiant heating system itself). This gets even more challenging in a crawlspace where workers would need to work on their backs to staple PEX to the underside of a floor. Nothing is impossible, but having a clean slate helps to keep the cost feasible. New construction and new additions are pretty easy to integrate radiant floor heating.

Project foreman inspecting in-floor heating in existing slab. (Notice the wood shelves in the background… a worker set those there, and they punctured the water pipes. Extreme caution is necessary).

Project foreman inspecting in-floor heating in existing slab. (Notice the wood shelves in the background… a worker set those there, and they punctured the water pipes. Extreme caution is necessary).

Water pipes laid in concrete slab before it is poured. Notice the insulation board below the pipes.

Water pipes laid in concrete slab before it is poured. Notice the insulation board below the pipes.

If you want to install the PEX into an existing concrete slab, you would either need to break up the slab and pour a new one, or you could cut out grooves to put the pipes into. Then you would cover those grooves with another layer of concrete and possibly another floor material. We have used radiant floor heating with success in all different floor materials - including hardwoods. Hardwoods do tend to shrink and swell with changes in temperature, so “engineered hardwoods” are a better choice when using radiant floor heating although we have never actually seen a problem with real hardwoods (only heard of them…knock on wood…literally).

There is a possibility of using electric radiant floor heating. This is not very efficient though. The cost of electricity to create the heat is not justifiable at this time. Most radiant heating is powered with natural gas or propane which is a lot cheaper than the electric counterpart. Electric radiant floor heating can be a viable option for small areas like bathrooms though. Small wires are laid on the floor (like a heated blanket), and they are covered with mortar and tile. A thermostat on the bathroom wall controls the system, and a thermostat with a timer can help keep the operation cost reasonable.

Manifold panel that sends heated water from a boiler to various parts of a home through PEX water pipes

Manifold panel that sends heated water from a boiler to various parts of a home through PEX water pipes

Gas powered radiant floor systems work with a boiler. A boiler is a box about the size of a shoe box for cowboy boots, and it has a series of water pipes that pass over a flame. The flame heats the pipes, and the water in the pipes gets hot. It is pretty simple. Once the water pipes leave the boiler, they separate out (in the manifold) into different pipes for each area of your home. Each of those areas can have their own thermostat, so you could individually control the heat. These pipes travel back to the boiler to keep reheating the water in the pipes. There is a complicated panel of pipes called a manifold that needs to be located near the boiler. This is where the water pipes separate out to travel to the different areas - and later return from those areas before being sent back into the boiler for reheating. This manifold is the “brain” of the system which has sensors that link back to the thermostats in each room and also link back to the boiler to tell it when to heat up some more water.

Besides their small size and efficiency, another good part about boilers is that they can also be a substitute for your hot water tank for your shower, tub, and sinks. This saves even more space. The boiler and manifold just need to be located in an area where you can run a vent pipe to the outside (since burning flames indoors requires oxygen to burn and also requires exhausting of the gasses to the outdoors).

If you are considering adding in-floor heating in an addition, you must also consider what you will do with your existing heating system. It is my opinion that two separate systems is too complicated. Also, once you have the boiler and manifold panel, it is a shame to not use that infrastructure to its maximum potential to heat the whole house - instead of just the new part of the house. You could remove the existing heating system and expand the in-floor heating to the existing house, or you could consider not doing radiant and just extend your current system to the new addition. Sometimes your existing heating system is not big enough to heat up additional square footage though. Your builder and architect can help you evaluate that. Sometimes we advise people to just make their current system work 150% to heat the addition and existing spaces until it breaks. Then they replace the existing system when/if that happens.

In summary, it is easy to incorporate in-floor heating in new construction and additions, but retrofitting it into an existing condition must be a labor of love since paying someone to do it for you would be a major expense.

If you’d like to learn more about our design process, visit www.josharch.com/process, and if you’d like to get us started on your project with a feasibility report, please visit www.josharch.com/help