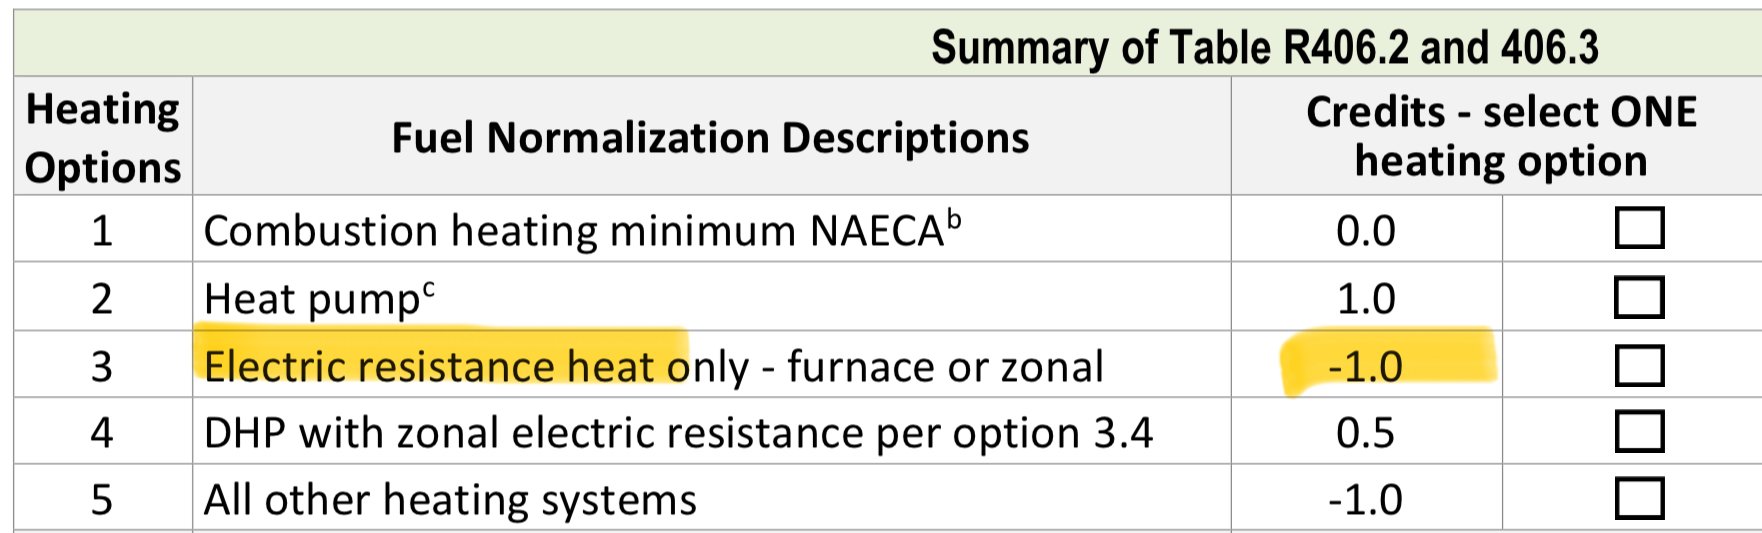
NR Zoning in Seattle by Josh Brincko

If you have read our other posts on zoning codes in Seattle, you might be confused. Don't worry, because we are confused too! The rules keep changing over and over again, so we are doing our best to keep up with it. The reason they have changed (most recently) is related to the state of Washington’s goal to create more housing throughout the State. The state government mandated that all residential lots are allowed to have at least 4 dwelling units (with certain exceptions). The local jurisdictions struggled to implement those new rules, so they did it in a very haphazard way. Architects had to figure out how to implement the new rules in a very short amount of time, and this was very challenging because none of it was very clear. The rules were actually not even published in a ordinary and public-facing way like they used to be. In fact, when you look up the land use codes on the ordinary website, it still shows you the old codes at the time of this writing. You have to be a detective to dig up the real rules in their current state, and even then, it is never certain which rules are adopted into law and which are still proposals. We will summarize those new codes below to the best of our ability.

Floor Area

Floor area ratio is basically a calculation of how much living space you are allowed to have on a property. The building department incentivizes land owners to have more dwelling units on a property by allowing more floor area. The calculation is somewhat complicated to understand, but essentially, if you have 1 dwelling for each 4000sf of land, you are allowed to have a floor area ratio of 60%. In other words, if you have an ordinary 5000sf lot with just 1 dwelling unit on it, you could have 3000sf of floor area in that dwelling since 60% of 5000sf is 3000sf. The ratio changes to 80% if you have 1 dwelling per 2201sf-4000sf of lot area. For example, if your lot is 5000sf, and you have 2 dwellings, the math looks like this: 5000/2=2500. 2500 is between 2201 and 4000, so you would qualify for the 80% ratio. This would enable you to have 4000sf of floor area. Next, the ratio changes to 100% if you have 1 dwelling per 1601sf-2200sf of lot area. For example, if your lot is 5000sf, and you have 3 dwellings, the math looks like this: 5000/3=1666. 1666 is between 1601 and 2200, so you would qualify for the 100% ratio. This would enable you to have 5000sf of floor area. Lastly, the ratio changes to 160% if you have 1 dwelling per 0sf-1600sf of lot area. For example, if your lot is 5000sf, and you have 4 dwellings, the math looks like this: 5000/4=1250. 1250 is less than 1600, so you would qualify for the 160% ratio. This would enable you to have 8000sf of floor area. You can apply that logic to a lot of any size for any number of dwellings. Note that if your lot is less than 5000sf, you are always allowed to have at least 2500sf of floor area no matter what the math says.

It is important to note that there are exceptions to what counts as floor area and what does not. The big idea is that usable floor space counts against your limit. Unfortunately, garages do count as useable space, so there’s no exception there. The city does allow you to exclude basements in most cases, so if you’re willing to dig deep and spend money on a basement, that extra square footage will not count against you. There are also nuances to the rules for projects that are stacked dwellings, low income dwellings, senior housing, and projects within close proximity to frequent transit service, but we will not cover those concepts here since they are very specific.

Maximum Density

There is also a limit to the number of dwellings you can have on each lot. The rules are quite complicated, but generally speaking, there are benefits that mainly apply to stacked dwelling units and dwellings in close proximity to frequent transit service. Otherwise, you are limited to one dwelling per 1250sf of lot area. This means that if you have a 5000sf lot, you can have 4 dwelling units since 5000/1250=4. If your lot is less than 5000sf, there is also an exception that still allows you to have 4 dwelling units unless there is a wetland, steep slope, shoreline, or other environmental critical area (ECA’s) on the lot. 5000sf is the magic number for a property. In fact, if any new lots are created, they must be at least 5000sf. If a lot is less than 7500sf and more than 1/4 mile from a major transit stop, it is allowed to have up to 6 dwellings as long as it doesn’t have any ECA’s as described previously, and as long as at least 2 of the units are designated as low-income housing. An ECA on a lot gets tricky for density calculations because you also have the option to calculate the number of residential units allowed as described previously and then to multiply it by the percentage of the lot that is NOT covered by an ECA. Regardless of the calcs, a lot is always allowed to have at least one dwelling unit. If the math results in a fraction over 0.85, you get to round up.

Height Limit

Generally, the height limit of residences is 32 feet plus an additional 5 feet for gabled roofs sloped at least 4:12. Shed and butterfly roofs are allowed to extend an additional 3 feet (and 4 feet at the overhanging portion). Railings for roof decks on flat roofs are allowed to extend an additional 4’ above the limit. Solar panels can also extend 4 feet above the limit. The city allows you to increase the height limit to 42 feet if the front setback is increased to 20 feet and there are at least 3 dwelling units. The higher limit is also allowed in certain situations with stacked dwelling units, but those nuances will not be covered here. Accessory structures (like garages) are limited to 12 feet in height when they are located in required setbacks, and the ridge of the roof can extend an additional 3 feet if it is pitched at an angle of at least 4:12. Lastly, older homes can exceed height limits by an additional 8 inches for the sole purpose of adding insulation.

Lot Coverage

The maximum percentage of a lot that can be covered with buildings is 50%. This means a 5000sf lot can have up to 2500sf of lot coverage. When calculating lot size for this calculation, you must exclude any environmental critical areas from the lot size. Essentially, any structure taller than 3 feet counts against lot coverage. Things that are exempt from lot coverage are decks less than 36 inches tall, unenclosed porches/steps less than 4 feet tall (above grade or street lot line), and most unenclosed structures. The maximum lot coverage is increased to 60% for stacked dwellings and also when dwellings that are in a frequent transit area are less than 3 stories and arranged around a shared green space that is at least 20% of the lot size.

Setbacks

When a lot has one or two dwelling units, the front and rear setback are 15 feet, and the side setbacks must calculate to an average of 5 feet (3 feet minimum). With three or more dwelling units, the front and rear setbacks are reduced to 10 feet. If a lot abuts an alley, the rear setback is always reduced to 0 feet. When a lot is less than 5000sf in a frequent transit service area, the rear setback is reduced to 5 feet and the side setback is reduced to 3 feet. Accessory dwelling units only require a 5 foot rear setback (and 0 feet when there is an alley).

There are certain exceptions to the setbacks for some architectural features. For example, roof overhangs, chimneys, and similar features can extend 2 feet into a setback (but never closer than 3 feet to a lot line). Bay windows can extend 2 feet into front and rear setbacks as long as they are no closer than 5 feet to the lot line, less than 10 feet wide, and no more than 30% of that facade. Unenclosed porches and steps that are less than 4 feet in height can extend to within 5 feet of a street lot line and 3 feet of a side lot line. Guardrails less than 42 inches high may exceed the 4 foot limit. Porches and steps can be covered if the cover is 5 feet away from lot lines and less than 15 feet above grade. That roof cannot be used as a deck either. The total area of porches attached to an individual dwelling unit is limited to 60 sf when located within a setback. When structures are less than 18 inches tall, they are allowed within any setback. Always be sure to leave at least a 2.5 foot wide walking path in side setbacks. Unenclosed structures are allowed within rear setbacks if they are not within 5 feet of that rear lot line (unless there is an alley), they are less than 12' feet high, and they are separated from the dwelling by at least 3 feet.

Detached garages and carports have different setback rules. They are allowed to be within side setbacks when they are within 40 feet of an alley centerline or within 25 feet of the rear lot line when there is not an alley. Otherwise, an agreement must be made with the abutting neighbor. They can be within rear setbacks as long as they are not within 5 feet of the rear property line. When one-car garages and carports are a maximum of 14 feet wide, they are limited to 300sf within the front setback. Two-car garages and carports can be a maximum of 24' feet wide with up to 600sf within the front setback. Their roof overhangs are excluded from coverage and size limits when less than a 2 foot extension, and the roofs of garages may not be used as decks when they are in rear or side setbacks.

Fences are allowed to be 6 feet tall within setbacks, but they may only be 4 feet tall within street setbacks. When a fence is on top of a retaining wall, they are limited to 4' feet tall, and the combined height of a retaining wall and fence cannot exceed 9.5 feet within setback areas. Fences are required to be setback at least 3 feet from retaining walls. Mechanical equipment must be at least 3 feet away from any lot line.

Existing structures that do not conform to these rules are allowed to be kept in place. Additions to those structures may also extend into a setback to the same amount as long as they are never closer than 3 feet to a lot line.

When there are more than one structure on a lot that contains floor area, those structures must be separated by at least 5' feet from each other and architectural features can extend 2 feet into these separation areas. Keep in mind that fire ratings are required when structures are less than 10 feet from each other.

Amenity Area

Each dwelling unit must have access to either a common or private amenity area. Those amenity areas must be at least 120sf and have a width and depth of at least 8 feet. Balconies are allowed to be as small as 60sf with a width and depth of at least 4 feet. Amenity areas may not include driveways, parking, bike parking, trash storage, or enclosed structures. Also, pathways that serve multiple dwelling units cannot be within amenity areas. Environmental critical areas may count as amenity areas. When adding one dwelling unit to an existing dwelling, amenity area is not required. Amenity area can also be exempted when development retains a tier 2 tree, when a certain tree point score can be achieved, or when new or existing medium and large trees can cover 10% of a lot at their maturity.

Tree Requirements

When adding a dwelling unit, trees must be planted or retained to earn a certain tree score as listed below or at least one new tree for every 2500sf of lot area (whichever calculates out to the greater number of trees). The tree score calculations are commensurate with the different dwelling density ratios that were described in the floor area ratio commentary previously. When there is less than 1 dwelling per 4000sf of lot area, you must earn 1 point for every 500sf of lot area. When there is 1 dwelling per 2201sf to 4000sf of lot area, you must earn 1 point for every 600sf of lot area. When there is 1 dwelling per 1601sf to 2200sf of lot area, you must earn 1 point for every 675sf of lot area. When there is 1 dwelling per 1601sf or less of lot area, you must earn 1 point for every 750sf of lot area. Preserved trees and new trees count toward the scoring. Depending on the size and species of trees, there are different point values for each tree assigned per Table B of 23.44.120. Generally, trees must be planted a specific minimum distance away from dwelling units ranging from 2 feet to 8 feet or more away. The Dept of Transportation decides how many street trees must be provided when one or more dwellings are added.

Parking

Parking must typically be accessed via an alley when there is an alley. Otherwise it can be accessed from a driveway connecting to the street. If access to parking passes through a setback, it may be used for parking. Surface parking is generally not allowed to be within 20 feet of a street lot line or within 5 feet of a side street lot line unless it is accessed through an alley.

If you’d like to learn more about our design process, visit www.josharch.com/process, and if you’d like to get us started on your project with a feasibility report, please visit www.josharch.com/help

Electric or Gas? by Josh Brincko

You have probably heard in the news that some cities are banning the use of natural gas for our buildings. This is not entirely true, but the basic idea is to eventually phase out the use of natural gas as a source of energy.

This is very interesting in the context of the Washington State Energy Code which governs the design and construction standards that relate to energy efficiency. In that code, architects are required to design certain features which earn a certain amount of energy credits. Depending on the size of the project, there are a certain number of points (known as credits) that must be earned within different predetermined categories.

For example, you can earn a couple points for using a heat pump, a half point for certain efficient appliances, and you can even lose points for using certain systems.

Specifically, the last version of the code basically banned the use of electric resistance heating. You actually lost points for using that form of electrical heating. Overnight, the code was changed, and the new version now incentivizes architects for actually using that form of electrical heating. One day you would lose points for electric heating, and the next day you earn points for the same thing! What gives?!?

This exemplifies just how ill-informed the codes are that govern what we design and build. How could they be so certain that something is so bad that you lose points and then quickly awarding points for the same thing? This is because legislators don’t really know what they are doing. They don’t think of the big picture, and they don’t empower licensed architects to make educated selections based on the actual situation that would make most sense. Instead, they empower themselves. Someone must have voted for them!

For example, if you have a project where there’s already natural gas that effectively heats the home with a new efficient furnace, then it would make a lot of sense to continue to use that method. If you have a project where the electrical service in the neighborhood does not enable the homeowners to upgrade their amperage to each home, then it makes sense to avoid using more electrical appliances that would put more strain on the electrical grid.

As the government vilifies the use of natural gas, they are still upgrading gas lines in neighborhoods - including my own as shown in the announcement below. They don’t want us to use gas, so they are upgrading the gas? Interesting.

Also, they are making laws that make it illegal to use gas on properties that don’t already have it, but they are ok with continuing to use it elsewhere - and even improve the gas infrastructure. You would think they would want that money spent on improving the electric infrastructure to coincide and support their goals. Nope. It’s completely inconsistent.

I do agree that electric energy is cleaner and is attractive since it keeps combustion and more mechanical parts that require maintenance out of our built environment, but that doesn’t mean it’s the only choice. I believe it should be up to a homeowner to decide how to heat their home and cook their food. If they have access to gas, they should use it if they want. If they have the ability to increase the electrical supply to their home to heat their home with only electricity, then they should do it. People will do what makes the most sense at the right time and right place.

Eventually, electricity will take over, but until that time, we have efficient ways of using gas and should consider to do so where it makes sense. At this time, we simply don’t have the size or amount of electrical lines in our neighborhoods for everyone to heat their homes with electricity. Once that infrastructure is updated, then we should consider making the switch.

Until then, don’t be so “amped” up about making the “switch” until you really know “watt” makes the most sense - or you might get “zapped” with a home that doesn’t have the power it really needs to be fully electrified :)

See below for excerpts from the previous energy code where you lose points for electricity and the current code where you are awarded points for using electricity. Also see the legislation that discontinues the expansion of natural gas and an announcement of gas upgrades in my neighborhood. This defines hypocracy.

If you’d like to learn more about our design process, visit www.josharch.com/process, and if you’d like to get us started on your project with a feasibility report, please visit www.josharch.com/help

Shower Valve Showdown: Thermostatic vs. Pressure Balance by Josh Brincko

When you want a shower, you want good pressure, and you want warm water - not too hot, and not too cold. There’s two ways to accomplish this: thermostatic valves and pressure balance valves. This post helps you understand the option, so you can decide which option is best in your new bathroom.

Here’s a quick summary:

The thermostatic valve is a fancier, more expensive device that automatically adjusts the temperature of the water internally without you needing to adjust the flow/pressure of the water.

A pressure balance valve is a lot cheaper, and it relies on your personal “skill” to increase or decrease the amount of hot water (or cold water) pressure, so you get the exact level of warmth you desire. In other words, if it’s too hot, you can either turn the cold valve higher, or you can turn the hot valve lower.

Alright, let’s dive in for some more detail…

Thermostatic Shower Valve: Keeping it Just Right

Let's start with the star of the show – the thermostatic shower valve. Picture this: you step into the shower, and with just a twist of the dial, you're greeted with a blissful cascade of water at your preferred temperature. Sounds dreamy, right? That's the magic of a thermostatic shower valve at work.

Benefits:

  1. Consistent Temperature: One of the most significant advantages of a thermostatic valve is its ability to maintain a constant water temperature, regardless of fluctuations in water pressure or temperature elsewhere in the system. Say goodbye to those icy cold or scalding hot surprises mid-shower!

  2. Safety First: Speaking of temperature control, thermostatic valves come equipped with built-in anti-scald features, making them a safe choice, especially for households with young children or elderly family members.

  3. Luxurious Experience: With precise temperature control and the ability to preset your preferred temperature, a thermostatic valve elevates your shower experience to spa-like levels of indulgence. There are even digital versions that have an electronic interface and even wifi that enables you to control the water temp!

Disadvantage:

  1. Cost: Let's address the elephant in the room – thermostatic valves tend to be pricier upfront compared to their pressure balance counterparts. However, considering the comfort and safety they provide, some may argue it's a worthwhile investment.

Pressure Balance Shower Valve: Simplicity with a Side of Safety

Now, let's turn our attention to the pressure balance shower valve – the reliable workhorse of bathroom fittings.

Benefit:

  1. Cost-Effective: If budget is a primary concern, you'll appreciate the affordability of pressure balance valves. They offer a cost-effective solution for maintaining a comfortable shower experience without breaking the bank.

Disadvantages:

  1. Temperature Fluctuations: While pressure balance valves do a decent job of stabilizing water temperature, they may not offer the same level of precision as thermostatic valves. You might experience minor fluctuations in temperature, especially when other water sources are in use simultaneously.

  2. Limited Temperature Control: With pressure balance valves, you have control over water temperature to some extent, but don't expect the same level of precision as a thermostatic valve. If you're particular about your shower temperature, you might find this lack of fine-tuning frustrating.

Choosing the Right Valve for Your Project

In the battle of thermostatic vs. pressure balance shower valves, there's no one-size-fits-all answer. Your choice will ultimately depend on factors such as budget, installation requirements, and the level of temperature control and safety you prioritize.

For those seeking ultimate comfort, safety, and a touch of luxury, the thermostatic shower valve is the clear winner. However, if you're looking for a practical, budget-friendly option that still ensures a comfortable shower experience, you can't go wrong with a pressure balance valve.

And there you have it – a friendly guide to navigating the world of shower valves. There’s also many more options available such as multiple shower heads, diverter valves to turn on certain shower heads and/or shower wands, and don’t forget about rain heads mounted into the ceiling and even multiple sprayers mounted in several different heights on the wall. You can even add a steam component to a shower! Feel free to ask for more detail. Happy showering!

If you’d like to learn more about our design process, visit www.josharch.com/process, and if you’d like to get us started on your project with a feasibility report, please visit www.josharch.com/help

Potty Talk by Josh Brincko

Nobody likes touching poop. Kids love joking about it, but touching it is no good. We all make poop, and there’s only three ways to avoid touching it:

  1. Hire a personal nurse that will handle your business for you. Unlikely, but thank you to all the medical pros out there that provide this service to those who really need it.

  2. Use toilet paper. Poop transfers more disease than almost any other item, so why not use 0.1mm thick paper to separate your clean hand from this gross, germ-ridden substance. Maybe you’re a “folder” and fold 10 layers of double-ply to create a 2mm thick germ barrier. Or, maybe your a “scruncher” and take your chances by scrunching a ball of toilet paper together to make a thick wad to wipe away the nastiness. You’re really taking your chances there since a crevasse in your random wad may randomly align with your finger. That’s really leaving your well-being up to chance. It also wastes a lot of paper.

  3. The best option (medically speaking) is to use a bidet or bidet seat - known as a washlet. This is a $100 - $1000 toilet seat that replaces the one you already have. These squirt water to clean your poop away … and it is HANDS FREE! The more money you spend on a washlet seat, the more features you get like: a heated seat, heated water, nightlight, deodorizer, pulsating massage spray, an air dryer, a heated air dryer, a sanitizer, and even a lid that closes automatically. The bidet or washlet cleans you better than just toilet paper alone. Since you don’t need to use any toilet paper (or just a few sheets to pat yourself dry), you end up saving paper, and you also save water due to multiple flushes that are commonly needed with too much toilet paper from wiping. Most toilet flushes are for moving toilet paper through pipes and not our actual human waste. Doctors also recommend bidets and washlets because cleaning with water is more sanitary and it prevents skin irritation and abrasions on your bum caused by repeated wiping with dry paper.

If you can’t tell, we are a proponent for option #3 above for saving water, saving paper, protecting the infrastructure from clogs, and preventing the spread of disease from fecal matter. In order to make a bidet or washlet seat work, you typically do not need any changes to ordinary plumbing. The device plugs directly into the ordinary waterline that all toilets use. The one consideration you do need to implement is an electrical outlet. Electricity controls the spray of water and the extra features if you have them (like the nightlight, fan, heat, etc). In existing homes, it’s usually relatively simple to add a new outlet nearby your toilet since most bathrooms have light switches and lights in them that you can tap into for a new outlet. A bidet or washlet will be life-changing. Give it a try!

If you’d like to learn more about our design process, visit www.josharch.com/process, and if you’d like to get us started on your project with a feasibility report, please visit www.josharch.com/help

Korea by Josh Brincko

Each year, I try to go on a sabbatical in a foreign place where I can learn from the architecture of the region. This year, I was able to visit Seoul, South Korea. I can confidently say they are 10-20 years ahead of the USA. Their building technology and modern style was amazing, and the photos below speak for themselves.

I found it particularly interesting that every Korean I met enjoys living in high-rise apartment buildings. The cities are very dense, and traffic is always intense. The stacked dwellings of 20 stories or sometimes many more offer security and efficiency even though it is a safe country and the apartments are not necessarily small. They are also very energy efficient. Many outlets have switches on them, so you can switch them off when not in use to minimize any “ghost loads,” and windows were often doubled. I don’t mean double-pane glass. I am referring to actually installing two window units: one on the exterior surface of the building for weatherization, and another on the interior surface for better temperature control.

The neighborhoods are very walkable with easy access to grocery stores, restaurants, outdoor activities, and more. The public transportation is also well developed, easy, and reliable. The average Korean seems to live a pretty happy and fulfilled life. Enjoy my photo journal!

If You Keep 1 Wall, Is It A Remodel? by Josh Brincko

No. That’s not a thing.

At one time, that may have mattered, but we have evolved as a species to not be that ludicrous. Every jurisdiction is different, but in our experience, there is no benefit (or requirement) to tearing down a house and keeping 1 wall. People often believe that you get some sort of special benefit by doing so, but that’s not how things work. The precedent of this mode of thinking came from one simple fact:

In some situations, homes were built WHERE they are not supposed to be, so keeping 1 wall helps to prove that there was a home there at one time. This proof makes it easier to rebuild in that same location since the codes generally allow you to rebuild in the same location - even if that location would not be allowed by the current codes. This is called a nonconformity. There is a very simple workaround to this, and it is often required anyway: get a survey.

A survey is a drawing that shows the exact locations of property lines and the buildings on a property. This is a legal document that provides the proof needed to show where a building is (or was). If you get a survey, then tear down the house, that survey will be all the proof you need to indicate where a house once was located.

So why would you want to prove that a house WAS somewhere?

In many land use codes, there are references to “existing nonconforming uses.” This is a fancy word for “grandfathered.” It just means that something was legally built according to the rules at one time (or lack of rules). In many shoreline situations, there’s these cute little old houses snuggled up against the beach. These used to be little getaways for families to enjoy the shore. When they were built like 100 years ago, they were just sort of off the radar in places that nobody really cared about at that time. Consequently, there were no rules at that time, so you could just do whatever you want, basically.

As time went on, and land became more and more scarce, building departments started to write rules (codes) for how you are allowed to use the land. On many shorelines, the rules state that you must build 50’ away from shorelines. In some cases, it can be 500’! So what about all those old homes that were built closer to shorelines than these new rules? That’s where the “existing nonconforming use” came into play. The building departments needed to write rules that dictate what you need to do when you’re in a situation that violates the new rules. These extra set of rules vary from place to place, but they basically all say the same thing: you can keep your existing building where it is as long as you consider X, Y, and Z.

That’s good news. If it’s already built there, it can stay there. The X, Y, and Z are just the nuances of how you’re allowed to do it. It may require that you get a survey to prove exactly where the building is located. It may say the building is allowed to stay there but maybe not get any higher. It may say the building is allowed to stay there, and it may even be allowed to extend in length.

In Seattle, where we do much of our work, the existing nonconforming code allows you to keep a house where it is - even if it is over its 5’ side yard setback. And, they even allow you to build the house up to the maximum height limit and even expand the length of the house (as long as it never gets any closer to the property line than the existing part of the house - and as long as it never gets any closer to 3’ to the actual property line). This means you need to get a survey to prove where the house is, and to prove where the property line is.

PRO TIP: don’t tear any old stuff down until you get your survey first! If you do a survey AFTER you tear stuff down, then there’s no record of where it was. Also, beware that in many jurisdictions, you have 1 year to rebuild things after they are torn down, so be sure you or your architect thoroughly research the rules for your situation. Also, it doesn’t matter how rinky-dink the existing building is. If it is an existing disturbance to the landscape, it can be used to prove that you can continue to maintain that “disturbance.” This works on hillsides, shorelines, within setbacks, and many other situations that don’t exactly meet modern day standards.

So next time you hear someone chuckle and whisper about how they are going to keep one wall in place, so they can call it a remodel or whatever baloney they think they know, you can be in our secret club that quietly rolls our eyes and thinks about how silly that is :)

If you’d like to learn more about our design process, visit www.josharch.com/process, and if you’d like to get us started on your project with a feasibility report, please visit www.josharch.com/help

Protect Your Home’s Privacy: BLUR IT! by Josh Brincko

Street view and aerial view maps can be pretty cool and helpful. We have all used this technology to see where we are going and what something looks like where we may be visiting. Most of us have viewed our own homes too. It’s kind of fun and convenient.

The “convenient” part is really the topic of this article. We don’t want to make it too convenient for unwanted people to see our home. Of course, anyone could just do a drive-by to see our home, but we can’t do anything about that. Sometimes, just making it difficult is all you need to do to protect your privacy. Do we really need everyone in the world to be able to see our private home so easily?

Here’s an example. We have had many clients who cut down a tree that was damaging their home or even built a shed for their kids’ bikes. Then some years later, they applied for a building permit. Guess what the sneaky building department reviewers do? They study images of your home on street view. They notice a tree stump, a missing tree that they do see on aerial view, or even a shed at the end of your driveway. Then they issue a notice as they review your permit application that requires you to resolve an issue with an illegal building or tree removal. This actually happens often.

Here’s the thing. When you cut that tree, you had no idea that it was protected or restricted in some way. It was completely innocent. Most people don’t know that they can’t just cut down certain trees on their own property. Most people have a really good reason for doing what they do on their own property, but the bottom feeders at the building department are not shy about raising a stink about it. They will issue a violation, and make you get a permit after-the-fact (which may not be possible), and they may issue fines until you mitigate the issue according to their rules.

This is crazy because they are basically making up the rules as they go. Sure the codes are published and passed by city council, but nobody knows that. It’s not like a speed limit that has a sign that tells you what you can and cannot do on public property. On your own property, you have to follow their mysterious rules that 99.99% of people don’t know or understand. In fact, even if you knew where to look up the rule, most people that aren’t practicing architects could not even understand that legal jargon anyway. It really creates a condition where you are likely to break a law because it’s virtually impossible to know and understand all the laws.

This is why it makes a lot of sense to limit what the government knows. If they can’t see your home on street view, then it’s a little less data available to them that they can later use to show that you broke some rule that you didn’t even know you broke. It’s kind of like driving with a cop behind you. If you make the slightest mistake, the cop is there to see it, and you are much more likely to get a ticket. This is why I always pull over when a cop is driving behind me. I don’t want to take any chance that I might get a ticket for something inconsequential that I don’t even know I’m doing wrong. So why give the building department that opportunity with our homes? Let’s take that opportunity away as best as possible. Here’s how:

Google Maps Street View

  • Navigate to your address

  • Click on “report a problem” (you might need to click on the 3 dots first)

  • Fill out the form

  • Shift the image so your house fits in the box

  • Repeat as needed until all views of your property have been reported

Apple Maps Street View

  • Send an email to: MapsImageCollection@apple.com

  • Type your address and let them know you’d like your house and property blurred for privacy concerns

Bing Maps Street View

  • Navigate to your address

  • On the disclaimer at the bottom, click on “report a privacy concern with this image”

  • Select home on the dropdown and fill out the rest of the form

  • Repeat as needed until all views of your property have been reported

After you do this, it could take a few weeks for the images to be blurred. Unfortunately, at the time of this writing, there is no way to blur the aerial photos of your home. Only the secret service was able to do that with certain federal buildings (like the White House).

If you’d like to go even further, you can even have real estate photos removed from sites like Redfin and Zillow. Again, those sites provide a snapshot of the condition of the inside of your home when you bought it. If you had an electrician add a light or outlet or whatever, technically that required a permit and an inspection. Did that happen? If not, some future inspector could compare those real estate photos to the current condition and spot items that may not have been done according to their process. This could even happen if some previous owner did work to your home. If they removed a wall, changed a window, added a shower, etc, you will be held accountable for those items if they didn’t get a permit for them.

What tends to happen is people apply for a permit for something else in their home, and in the course of getting the permit approved or from hosting required inspections, those things might be noticed by the inspector. Then, you will have to get permits for them after-the-fact.

Sometimes that is not so easy because the plumbing, electrical, screws, nails, or other hardware is concealed under the drywall, so you may need to unbuild it to prove it was built properly (by the previous owner’s builder who you have no control over). You may not realize it, but the size of screws, number of nails, and thickness of plywood are all things subject to scrutiny by the building department.

If you like your home, and you’d prefer not to give the building department (or others) extra information about your home, here’s how you can remove images from real estate sites:

Redfin

  • You will need to login, so make an account

  • You will need to “claim” your home on your account

  • When you are logged in, click on the dropdown on your name at the top right

  • Click “owner dashboard”

  • Select your home

  • Click “edit photos”

  • Check the box to “hide listing photos”

Zillow

  • Log into your account or make an account

  • Click on the “more” dropdown

  • Click on “verify your ownership”

  • Answer the questions

  • Click on your profile icon

  • Select your home

  • Click on the tile for your home to load the property page

  • Click on “Edit Facts” icon from Owner View of the property page

  • Remove the photos and save

Realtor.com

  • Go to realtor.com/myhome

  • Type in your address

  • Click the magnifying glass

  • Claim your home by following the prompts

  • Go to your profile

  • Click on “my home” tab

  • Click on “owner dashboard”

  • Click “remove photos”

  • If you have problems, reach out to support.realtor.com/s/contactsupport

You should also contact your real estate agent and ask them to remove as much information they can from the Multiple Listing Service (MLS) database. I hope these tips will help to protect your privacy and save you some grief if you ever go through a permit process.

If you’d like to learn more about our design process, visit www.josharch.com/process, and if you’d like to get us started on your project with a feasibility report, please visit www.josharch.com/help

New Seattle Land Use Code Changes (NR1, NR2, and NR3 zoning) by Josh Brincko

BE ADVISED: The land use code has changed significantly in Seattle during the summer of 2025 and again in 2026, so many of the data points listed below may be out of date. Some still apply. We will create a new post when the new code is fully created, understood, and all the wrinkles ironed out.

Visit www.josharch.com/blog/new-seattle-land-use-code-changes-nr1-nr2-and-nr3-zoning for additional info.

If you’re confused and not sure where to start for planning a small remodel, or even a large addition, or a totally new construction project for your house in Seattle and other areas, you are not a stupid, total idiot:) Even for a seasoned veteran architect in Seattle who specializes in residential architecture, the codes, rules, regulations, policies, etc are very confusing to say the least. If anyone is a stupid idiot, it’s the ones who wrote the codes in such difficult language:) I am here to help, and this post is your guide to help you navigate the thick bureaucracy. (It is also worth noting there is a major difference between the “building code” and “land use code”. This post only dives into the “land use code” to help you understand WHAT/WHERE you are allowed to build on your property and not the “building code” which gets into the specifics of HOW to build something.)

All of the housing rules in Seattle got significantly changed in 2025, so be sure to educate yourself by reviewing the paragraphs below.

The land use code classification that is applicable to most single family homes in Seattle is known as NR3 (formerly named SF5000, SF7200 renamed to NR2, and SF9600 renamed to NR1 for larger lots). The “SF” meant: Single Family. The 5000 meant the property is more or less 5000 square feet. The rules are pretty much the same for all these zones except for the bigger lot sizes. The new naming convention of “NR” means “Neighborhood Residential.”


OVERVIEW

The most basic, common concepts in NR zoning are yard setbacks, maximum percentage of lot coverage, floor area ratio, and height limit. Some of the other nuances in the codes are the exceptions to all these rules, tree requirements, and parking requirements. Some projects may also involve various other codes for garages, ADU’s (accessory dwelling units), DADU’s (detached accessory dwelling units), existing nonconforming uses (projects with non-compliant stuff that is “grandfathered in” since it was built before the codes existed), allowable uses (like using your house as a hotel), and ECA’s (properties within environmental critical areas such as steep slopes, shorelines, etc).

In Seattle, I have dealt with zero properties that are straightforward. There is always something weird about each lot such as a part of the existing house that was built too close to the property line, a part of the lot that is considered an ECA because it is too steep, something a previous owner built without a permit, difficulty in determining which side is technically considered the “front,” or a tree the city won’t allow you to remove (which causes the lot to be less than ideal to build on). Because of these anomalies that always seem to pop up, no two projects have ever been the same (and I do about 100 of them each year). The rest of this blog post will dig into each topic separately to attempt to give you some insight into each of the major codes for NR zoning. Although this will give you a basic understanding, please reach out for confirmation since this stuff gets really complicated and must be vetted (we are not liable for your use of the information herein). Also, just because the code says something in “black and white,” the building department may actually interpret it to mean something completely different. And, they are not always correct in what they tell you. I commonly argue with them to show them what the rules actually mean (and not let them bestow their “opinions” on me). There’s usually some compromise, but I’ve never lost an argument with the building department.


HEIGHT LIMIT

Let’s start with the height limit since it’s one of the easiest to understand. The maximum height of a house is permitted to be 32’, and this is measured from the “average ground height” to the top of the highest wall. A sloped roof of a certain angle (4:12) can extend an additional 5’ higher. The average ground height is determined by measuring the height of the ground at the middle of each exterior wall and taking the average of those. For example, if the ground sloped down so the front was 2 feet higher than the ground at the back of the house, and the sides were each 1’ higher than the back of the house, then (2’+1’+1’+0’)/4 = 1’. So in other words, the average ground level is 1’ higher than the back, and 1’ lower than the front. If you measure 32’ up from this imaginary line called “average grade,” the house could be 31’ tall in the front and 33’ tall in the back. The sloped roof can go another 5’ higher, and you’re also allowed to have chimneys, vents, skylights, and dormers of limited sizes within this 5’ bonus area (and sometimes higher). There’s also exceptions for green roofs and certain features of roof decks. As you can see, it’s not as simple as just saying: your house can be 32’ tall.


SETBACKS (YARDS)

Next, let’s review setbacks. A setback is the distance from a property line where you are not allowed to build (certain things). To be able to determine setbacks from each property line, you first need to know where the property lines are. No, your fence, sidewalk, curb, rockery, driveway, or that thing the old guy in the neighborhood showed you once is likely NOT THE PROPERTY LINE. Sorry. It’s probably not. A property line must be determined by a licensed surveyor by taking precise measurements with very technical instruments. Then, they put a surveyor’s pin to mark the location of the property corner (and sometimes these are intentionally placed NOT on the corner of the property as you may expect).

Once you know WHERE the property lines are, THEN you can determine which is considered the front, side, and rear property lines. This may seem straightforward, but sometimes it is not. This is too complicated to write about here, so let’s talk about this topic on a case-by-case basis. Feel free to reach out since your front door, address location, your actual street address, or your driveway do not actually determine which property line is the front.

In NR zoning, the front setback is 15’, but if you have 3 or more dwelling units, you can reduce it to only 10’. The rear setback for NR zoning is also based on the number of units you have on the lot. If you have 1 or 2 dwellings, you need to provide a 15’ setback from the rear property line, and if you have 3 or more dwellings, you only need to provide a 10’ rear setback. If you have an alley, you are allowed to build directly up to the rear property line (regardless of how many units you have). The side setback is easy in NR zoning. It’s 5’. At least that one is easy! There are also a lot of exceptions to the rules for various parts of a structure, so be sure to consult with us for specific clarification.


LOT COVERAGE

The next topic is lot coverage. In NR zoning, you are allowed to cover 35% of your lot with structures. If the lot is less than 5000SF, then you are allowed to cover 15% of the lot plus 1000SF. If your lot abuts an alley, you are allowed to factor 1/2 of the area of the alley into your calculation for the size of the lot. If you have 2 or more dwelling units on the lot, then the maximum lot coverage calculation increases to 50% of the lot area. Lot coverage is pretty easy to calculate, but the exceptions to the rule do get tricky. For example, decks lower than 36”, solar panels, fences, and the first 36” of roof overhangs do not count against lot coverage, and there are some additional nuances to what counts and what does not.


FLOOR AREA RATIO

Floor Area Ratio (known as FAR) is the last topic we will discuss here. This is a measure of the usable floor space inside a building. So, if you have a 1000sf first floor and 1000sf second floor, then you have 2000sf of floor area used up…sort of. The stair doesn’t count twice, some basements don’t count, certain porches don’t count, and there’s also other exceptions that don’t count against you. In the NR zoning classification, there is a sliding scale for the amount of floor area you are allowed to have, and it is based on the number of dwelling units the property has. The calculation is a ratio between the number of dwelling units and the size of the property. With less than 1 unit per 4000sf of lot area, you are allowed a floor area ratio of 60% of the lot size. For example, if you have 1 house on a 3000sf lot, 60% of 3000sf is 1800sf of maximum floor area allowed, BUT the minimum allowed for any lot is always 2500sf (even if the calculation is less). Also, if you are in an RSL zone, the calculation is 75% of the lot area. If your NR lot is slightly more dense and has between 1 unit per 4000sf and 1 unit per 2201sf, then the FAR increases to 80% of the lot area. If your NR lot is even more dense and has between 1 unit per 2200sf and 1 unit per 1601sf, then the FAR increases to 100% of the lot area. Finally, if your lot is denser than 1 unit per 1600sf, the your FAR increases to 120% of the lot area. For example, if you have 4 units on a 5000sf lot, that ratio is 1 unit per 1250sf, so you could use the FAR of 120%. That means your 5000sf lot can have a maximum of 6000sf of floor area. If you have an alley, you do not get to factor half of the alley into your calculation like you would for the lot coverage calculation discussed earlier. This is my current understanding of this new code that was introduced in 2025.


CONCLUSION

I hope this post was informative and gives you a basic understanding of the NR (SF) zoning classification in Seattle to help you determine approximately what you’re allowed to do with your property. I recommend that you do not discuss specifics of your project with the building department unless you first run it by an architect that is VERY experienced in the zoning classification in your area since you may “shoot yourself in the foot” by saying the wrong thing and get locked into adverse interpretations. We are here to help you figure out the specifics since the rules are tricky and there’s a lot of exceptions to the rule that can be used in your favor. As a disclaimer, the topics covered here are generalizations that could easily get misinterpreted, and you should consult with an expert architect for specific interpretations.


If you’d like to learn more about our design process, visit www.josharch.com/process, and if you’d like to get us started on your project with a feasibility report, please visit www.josharch.com/help