

Example of a simple elevation drawing for permitting purposes (does not explain much to the builder)
The honest truth is that permit drawings are basically useless. They tell you the approximate size and shape of a building, but they do not actually communicate any specific information to enable a builder to build it. A set of permit drawings are just the basic drawings that comply with a building department's checklist to verify the building is allowed to be built on the property, and it also shows it will meet the most minimum standards of safety and energy efficiency. Other than that, additional construction drawings are necessary to describe the construction details and materials to the builder. The building department is not concerned with higher levels of detail.
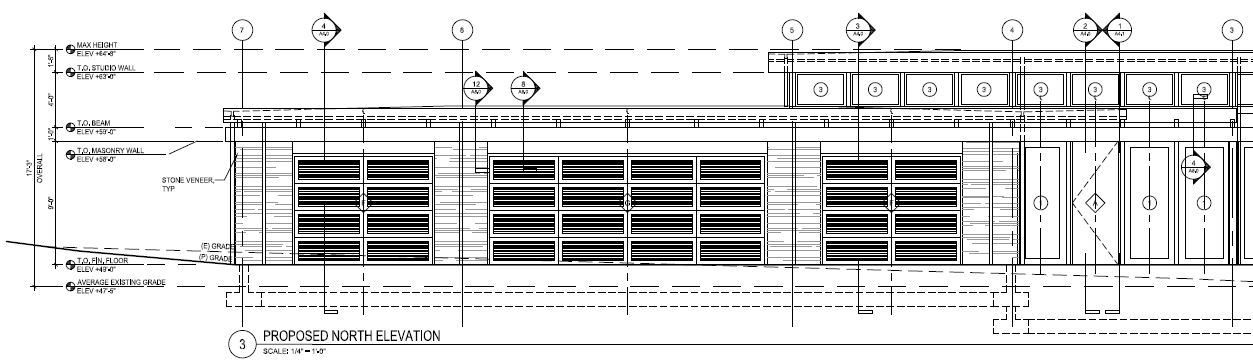
Example of a construction drawing (explains heights, materials, and cross-references for other construction details shown on other drawing sheets)
Construction drawings focus on the minute details like the attachment of a stair tread to a stair stringer as well as larger items like the exact specification of a window, door, or countertop. The building department typically does not care what kind of stain you are using on your cool staircase or whether your stone countertop is honed or polished. They don't even need to know the exact size of various items, so we tend to round up to allow ourselves more flexibility during construction. Since they don't care, we don't show this information on permit drawings. This is not because we are lazy. It is more about the efficiency of the process. First, everything in a set of permit drawings is public record, and the city charges you money to review the drawings. If we include information beyond their basic checklist, it will take longer for them to review and cost more money for their review time. They may also start to unnecessarily scrutinize the type of marble you specify which wastes everyone's time. Additionally, drawings constantly change throughout the process of design AND construction for any number of factors: changing codes, budget constraints, technological product advancements, realizations of new opportunities during construction, discontinued materials, materials with long lead times, changing schedules, etc. There are so many factors that affect the final design solution that we simply do not even attempt to solve it in the permit drawings since they are so early in the design and construction process.

Example of a construction detail typically not included in a set of permit drawings (explains the materials, physical relationships, how they are layered, and concerns like waterproofing, insulation, and level of finish)
The reality is that most design solutions happen DURING construction. Sure, we do come up with the big idea in the start of the design process, but that big idea has literally thousands of decisions that need to get made before it manifests itself as a real building. For example, on a set of permit drawings, we simply draw a wall on a floor plan. The building department eventually approves that wall placement and its structural components. We still need to figure out what the ingredients of that wall may be. It may be the simplest 8' high 2x6 stud wall consisting of level 4 primed and painted 1/2" drywall on the interior, R21 batt insulation, and 7/16" plywood with felt paper and vinyl siding on the outside. OR, that same wall on the floor plan could have a 10' height leading up to a sloping ceiling with reveal reglets creating shadow lines, a 2x8 bottom and top plate with staggered 2x4 studs, R30 batt insulation, 1/2" polyiso board insulation with taped and sealed seams on the inside, 5/8" level 5 finish mold-resistant drywall with PVA primer and paint, and densrock exterior sheathing with wetflash waterproofing, 2" polyiso insulation panels, nailer strips, and standing seam aluminum Kynar finished siding. Each of these walls is code compliant and will pass the checklist with the building department, but this information is not exactly conveyed to the building department. It all looks the same on a floor plan. This information is later conveyed on construction drawings.
This level of detail is also completely communicated through other means with builders and suppliers during construction administration by the architect to help protect the client’s investment. This is the design phase that happens during construction. This is when the builder actually starts to order materials and install them. When materials are sourced, the supplier who sells them, the fabricator who crafts them, and the sub-contractor who installs them are all consulted to verify the integration of all of these different products and methods of construction are going to work successfully for each individual scenario in the building. What happens when this wall material touches a wood floor and a tile floor? What happens, when the countertop dies into this wall? How is a window jamb framed into the interior and exterior portions of this wall? How do you integrate the waterproofing into the foundation and different roof lines above this wall? The endless scenarios seem to never end. There are so many unique conditions that occur in a building that it is not possible to evaluate them all during permitting or other design phases when we don't know the exact budget, the exact builder, the exact sub-contractors, the exact fabricators, and the exact suppliers. All of these items come together as the project develops into a real building during construction.
Many clients like to plan for as much of this as possible ahead of time. This diligence can payoff, but decisions still change 100% of the time as the building progresses. Any factors that cannot be controlled will almost definitely have an impact on the decisions that are "set in stone." When these changes occur, more time is spent modifying the drawings to adapt to the newly encountered information. In some situations it makes sense not to plan certain things at all and just wait until construction commences to make the most educated decisions. Do you know the condition of your sewer line below the foundation where you may add the addition? Nobody does, and this could affect the entire approach.
In other situations, there is enough data available to make a solid decision, and we do create quite detailed drawings ahead of time. These enable the builder to provide a more accurate estimate for that particular scope of work. This extra information also empowers the builder to ask even more detailed questions to the architect which, in turn, causes even more detailed analysis and more detailed drawings to ensure it gets built properly. When deciding how thick to frame a plumbing wall in a laundry room, you may need to actually have the washer or dryer purchased and on-site to ensure the vent duct and plumbing lines frame in perfectly without protruding too far away from the wall and without interfering with the other plumbing, mechanical, and electrical items that may be located within that same wall. Only so much can be planned from reading the manual of an appliance before buying it. Of course you wouldn't want to buy and store a washer and dryer for a year before you actually need to install it, so for this reason, things like this really should wait until construction begins to really hash out the details.
You may wonder why the wall thickness really matters for encapsulating these utilities? Whats an extra inch here or there? Who cares if the dryer sticks out from the wall a bit? Well.....You might care if it affects the placement of a nearby door. You don't want to open that door and have it bump into your dryer. You also don't want to swing the laundry room door open and have it hit your opened dryer door. Even worse, you don't want to end up with a door not large enough to fit the dryer into the laundry room. All of these items are related, and they can only be planned so far in advance. The exact details typically get drawn on a piece of plywood by the architect at a jobsite meeting the day they are being installed long after permit drawings were ever created.
As an architect, we help you weigh out the pros and cons of planning too much or not enough. This relates to the level of detail you want to get into, the quality of construction desired, and the budget you are willing to spend. A little investment on design fees for planning always saves a lot more in construction costs when things do not get built ideally. We have the experience to know how to balance this risk and reward, we know when to hold the builder accountable for adhering to estimates for specific scopes of work specified in the drawings, and we know when it is appropriate to draw specific details or to save your time and money by not drawing certain details at all.
If you would like our help, please fill out our new project form at www.josharch.com/help to get us the information we need to perform a feasibility report for your property.
Also, please read through our design process page to learn how we help you go through the design and construction process at www.josharch.com/process.
Lastly, if you’d like to learn more about design and construction costs, here’s the calculator we use to help estimate these fees: www.josharch.com/cost. (This calculator doesn’t work on mobile phones or tablets, so you will need to get serious and hop on your computer)